

How To Repair Rotted Window Sash
Fifty-fifty high-quality woods windows can rot or develop bug over time. Here are skilful means to fix them.
Repairs with dwelling house windows boil down into 2 bones groups: i) fixing problems with window frames and sash, and two) replacing or repairing window glass. In this commodity, we look at window frame and sash issues. For information on window glass repairs, please see How to Supersede or Repair Window Glass.
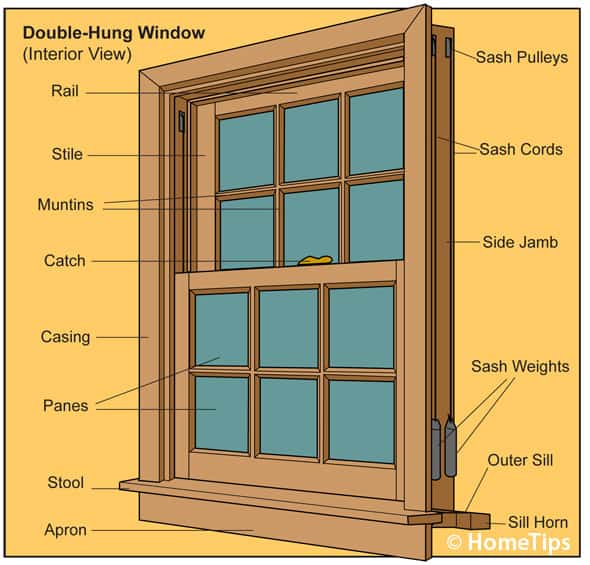
Simply to be clear, window sash is the part of a window that holds the drinking glass. Windows may have either stock-still or operable sash, as discussed in the article Window Buying Guide. Both types can take bug but, of course, operable windows may take additional issues with their mechanisms. Operable windows usually piece of work reliably for years, merely, with time, their workings can become balky.
Windows made from metal or composites have fewer issues created past weather than forest windows, because wood is prone to rot with prolonged exposure to dampness and tin can crack with exposure to sunday. Wood is also delectable to termites.
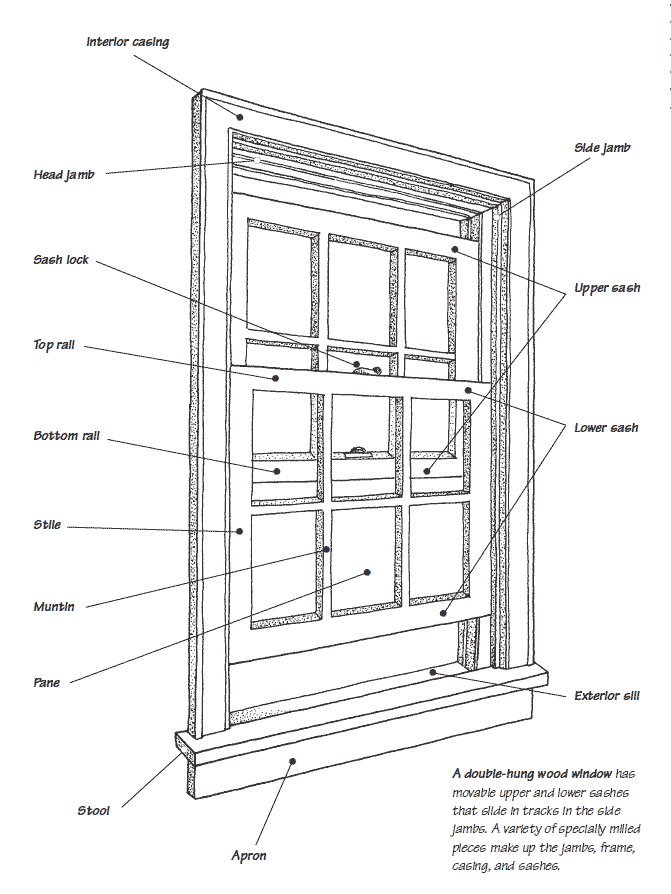
Double-hung wood windows—the blazon with a lesser section yous can raise and a peak section you can lower—are the biggest offenders. When they get bad, they're nearly impossible to open.
Repainting wooden frames every three to five years, depending on your prevailing weather weather condition, will preserve them—just don't let built-up paint seal them shut. When painting them don't let paint lap over whatever moving parts. As well, yearly maintenance, such as filling cracks with putty and caulking the edges, will become a long way toward protecting them.
Even vinyl and aluminum windows need a little basic care to proceed them working smoothly. You lot can scrub both types with a natural bristle brush and detergent solution. If you have anodized aluminum frames, you tin restore their luster by polishing them with fine steel wool and then coating them with paste wax.
Repairing Rotted Woodwork
Where a woods sill or sash has taken serious abuse from weather, resulting in rot, y'all can use epoxy wood filler, bachelor at habitation centers, to repair the expanse. (If large areas are affected, talk with a carpenter about cutting-out and replacing sections of the woods or the unabridged sash.) Contact a window replacement or repair contractor if you need assistance.

1 Use a chisel to dislodge virtually of the loose, rotted woods. Drill a few 1/4-inch holes into the damaged wood. Soak the entire rotted area with liquid epoxy "consolidant" to transform the surface area into a sturdy base for filler. Allow the woods blot it for well-nigh five minutes and and so reapply it, wait, and reapply it again until the wood ceases to accept the consolidant.
2 Mix a batch of epoxy filler according to label directions and brainstorm to mold the repair. As the textile cures, dip an one-time putty knife or flat paint stirring stick in solvent and use it to pack and shape the repair.

three Sand, file, and/or rasp the surface area until information technology is shine and flat.

4 Because the filler lacks pliability, the surface is likely to have dips and voids even after sanding. Use a putty knife to apply outside-class vinyl patching chemical compound to fill any remaining holes and voids. Let this to dry, and then sand information technology shine and repeat if necessary. Finally, prime and pigment within iii days.

Stuck Double-Hung Window
The most common trouble with double-hung windows is that they go stuck in their tracks. This can happen considering of loftier humidity that swells the wood, accumulated grime that blocks the tracks, or repeated painting that seals together the surfaces.
Double-Hung Window Is Temporarily Stuck
If a sash is temporarily stuck because of high humidity, simply waiting for the weather to change may solve the problem. If a sash moves reluctantly, make clean the sash channels.
If the channel is squeezing against the window, widen the aqueduct by inserting a forest block where it binds and tapping information technology with a hammer.
If crud is blocking the channel, use a sharp woods chisel to remove the blockage. Then, using medium sandpaper wrapped effectually a wood cake, sand the channel. Finally, lubricate the channel with a coating of wax.
If y'all can't budge the window, employ a utility pocketknife to cut the painted edges of the sash. So work a 3-inch-wide putty knife between the sash and frame and tap information technology with a mallet.
From outside, wedge a prybar between the sill and sash; work alternately at each corner and so the sash moves upwards evenly. Protect the sill with a wood cake.
Double-Hung Window Is Painted Shut
If y'all accept a double-hung window that has been painted shut, you can usually go it working over again by cutting through the paint that is sealing the sash around its perimeter. Try this:
Apply a utility knife—or, better yet, a special fiddling tool that looks like a serrated metal spatula called a window saw (available at pigment and hardware stores for nigh $10)—to cut through the paint all around the movable sash. Exist conscientious not to leave any areas uncut both inside and out and also take intendance not to harm the painted surfaces.
Make certain the window is unlocked. Also brand sure that there are no nails or screws securing the sash to the jamb; if in that location are, remove them. Then try to force the window open with precipitous force, using the heels of your hands.
If that doesn't work, effort to costless the window with a wood cake and a hammer or mallet, but be careful not to jar the window and then hard that yous pause the glass! Once yous become the window open, brush abroad the loose paint.
Window Sash Is Too Loose
Although many windows suffer from existence besides tight—or worse, completely stuck—another occasional trouble is a window sash that is too loose. All wood shrinks to some degree over time, and wood wears down from use. The result is a window that rattles in its tracks.
A sash that is too loose tin be tightened. If the gap is non too wide and the terminate is nailed rather than screwed, y'all can suit the stop slightly without really removing it.
Score the paint between the stop and the jamb, and identify a cardboard shim between the terminate and the sash. Protect the stop by holding a block of wood against information technology, and hammer toward the sash along the length of the stop until the paint film breaks and the stop rests against the shim. Then secure the finish with finishing nails. For wide gaps, reposition the stops.
Another piece of cake ready is to add an insulation strip to the face up of the old parting strip. Information technology may take up simply enough slack in the window, and information technology also adds protection confronting the elements.
Window Falls Shut
Do you accept a double-hung window that won't stay open unless you prop information technology up? Most of the time this is caused by a cleaved sash cord. This is an cheap and relatively easy set, merely it does take a bit of fourth dimension.
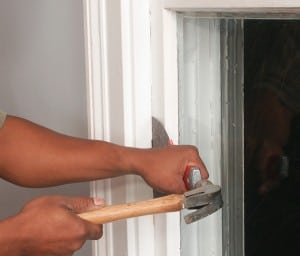
1 Remove the interior stops. To do this, you'll probably have to piece the paint seal with a utility knife and and so, using an former chisel, pry off the moldings. If the window has weatherstripping, remove it.
2 Tilt out the bottom sash and remove the sash cords. Lower the weights carefully (if both sash cords aren't cleaved). If y'all desire to supersede the sash cords in the upper sash, y'all'll accept to pry out at least one of the departing strips to remove that sash. When you lot pry the parting strips out, they volition more than than likely be ruined, so plan on buying new ones at a lumberyard.
3 Remove the admission panel covers located on the inner face of the window frame.
4 Laissez passer new #7 cotton sash cord over each meridian pulley and feed it down until it drops into the access area. If necessary, employ a aptitude coat hanger to pull it through the access pigsty.
5 At each side, tie the end of the string onto the sash weight and and so, with the weight sitting on the lesser of its channel, pull the cord taut and cut information technology off nigh 4 inches from the tiptop caster.
6 Tie a knot and push the knot into the top slot at the side of the sash. Tack the knot with a brad. Test the activity of the window upward and downwards.
7 Reassemble the rest of the window, reversing the club of disassembly. Be sure the stops are not so tight that they cause the window to bind.
How to Protect a Window Sill
The sill is the part of the frame that takes the worst chirapsia because it extends out from the window. To protect a peculiarly vulnerable sill, y'all tin embrace it with a sheet of aluminum and pigment it to match the wood. This is really a very piece of cake project and offers excellent protection.
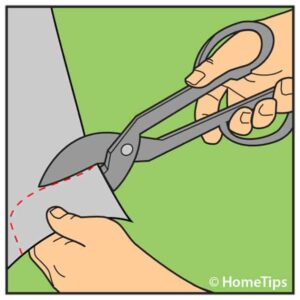
Start, cutting a paper template that fits the sill. Lay the template on canvass aluminum (available in rolls or sheets at home improvement centers), and mark the pattern on the metal. Using can snips, cut out the design.
Caulk the sill edges and wedge one side of the aluminum to the stool of the sill and nail it in place with 1-inch roofing nails.
Tape a block of wood over the surface of the aluminum and tap information technology with a hammer so the aluminum takes on the shape of the sill. Smash it underneath the sill and seal it forth the edges with caulking chemical compound.
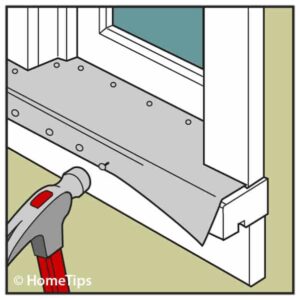
Prime number with metal primer and pigment to match your trim.
Featured Resource: Find Local Pre-Screened Window Repair Pros
Source: https://www.hometips.com/repair-fix/windows-double-hung.html
0 Response to "How To Repair Rotted Window Sash"
Post a Comment